Thursday, November 26, 2009

Tweak your Windows XP using TweakUI...

Here's a neat little utility that will enable you to tweak your Windows XP, the TweakUI. This application has lots of neat tweaks in it. Just install it and go through it SLOWLY.

Yes, i'll mention it again SLOWLY, because I don't want you to miss the tweaks that you can do with this utility. I've been using it personally and there's no problem with it ever since. It is from Microsoft and I want to share it with you guys.

Before i'll give the link, I just want to orient you with what's in it.  In there, you will see different subheading on the left side corner and each subheadings has their corresponding tweaks. Like the mouse. In there you can increase the sensitivity of your mouse and the Hover sensitivity and time. Another neat features available are that you can remove the arrows on your desktop icons or enable or disable autoplays.

These are just bits of it. So for the third time go through it SLOWLY. Enjoy!

So here's the link guys:
http://download.microsoft.com/download/f/c/a/fca6767b-9ed9-45a6-b352-839afb2a2679/TweakUiPowertoySetup.exe

Thursday, November 19, 2009

Tired of your old cursors?

Here's a link for you to get brand new cursors that would suit your style and personality.
Link:
http://www.customise.org/browse/cursor

To download it, just click on the cursors you want, then it will preview what you have selected.
If you want it, just click the Download file below the previewed cursors then select the Click here to download: (whatever choice you have).
It will now download the file in a Zip. Now here's what you're going to do:
  • If you have saved the file from your hard drive, just right click on it and extract it to c:\windows\Cursors then click OK.
  • Now go to the Control Panel and open the Mouse option to change the settings.
  • In there you can now select on the Pointers tab and change the pointer by clicking on Browse... at the bottom part of the dialog box.
  • Once you have selected (Browse...), just select the folder or the mouse pointer you want.
  • After you're done selecting the pointer, just click open and it will revert back to the dialog box where you have your options on what to customize.
  • If you want to change the Help Select, or Working In Background or whatever, you can do so by following the same procedure as to the 4th bullet.
  • Now if you're done changing everything, just select Apply then OK.
You're done! Enjoy your new mouse cursors!


Monday, November 16, 2009

Free antivirus for you...

There are a lot of free antivirus that are available right now, yet what I personally recommend is Avast Home Edition and the AVG 9.0 which is the current version as of now (from the date of publishing). Although they are free yet they give you the basic virus protection you must have, like malware protection and basic internet protection.

So if you want to download them, here are the links:

Avast
http://download.cnet.com/Avast-Home-Edition-Free-Antivirus/3000-2239_4-10019223.html?part=dl-85737&subj=dl&tag=button

AVG
http://download.cnet.com/AVG-Anti-Virus-Free-Edition/3000-2239_4-10320142.html?part=dl-10044820&subj=dl&tag=button&cdlPid=11014801

Wednesday, November 11, 2009

Want to hide a folder in the desktop?

This is for Windows XP users, I haven't tried it to other operating systems but it works on Win XP. So here's how you do it:


  • Right click on your desktop and create a new folder
  • Once you've done that, delete the name new folder
  • Then once you've deleted the name, hold down the Alt key
  • Don't release the Alt key yet, from your Number Pad (numpad), key in 0160 and release the Alt key
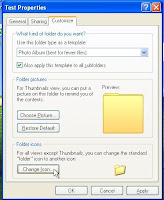
  • Now, you're folder has already a hidden name, to hide the icon of the folder, right click on the folder
  • Then go to properties
  • Then select the Customize tab which is the tab on the far right

  • Then you will see at the bottom part, Change Icon tab
  • Select it, and it will open the default icons
  • Now, scroll on the different icons and once you see a blank space (it's just like a space between the icons and you can see there three blank spaces that are in a column) click the top area
  • Once you've clicked it, it will select a blank icon
  • Then press Ok
  • Then Apply
  • Then Ok
Select the area where you've placed your folder and you will notice there the icon that you've created. You can double click on it and then save files on that folder.

If you want to delete it, just simply click the folder and then press delete.

I hope you will enjoy it and Happy Hiding!

Tuesday, November 3, 2009

Introduction to Windows 7...

Hi guys! Before I would like to present some tips, tweaks, or other reviews about Windows 7, it would be appropriate to introduce it to you,  for us to have the basic knowledge, since the Operating System (OS) is still new in terms of it's release from the public.

To begin with,